Alle informatie vind je hier!
okt
10
Alle informatie vind je hier!
Bron: F5UII
After the article on the configuration and installation of a Nextion screen on a MMDVM repeater, let’s see together how to integrate a small OLED display on MMDVM.
This type of display is known by the reference SSD1306, it measures 27 millimeters for a display definition of 128 x 64. There are two variants of the SSD1306 display, one running on SPI bus and the other on I2C. I chose the I2C bus model, recognizable by these SCA and SCL pins. It is monochrome but also exists in a yellow and blue two-color version. Only the lines on the top of the display are yellow. This is the model I use.

OLED SSD1306 display
You are connected to Raspberry Pi.
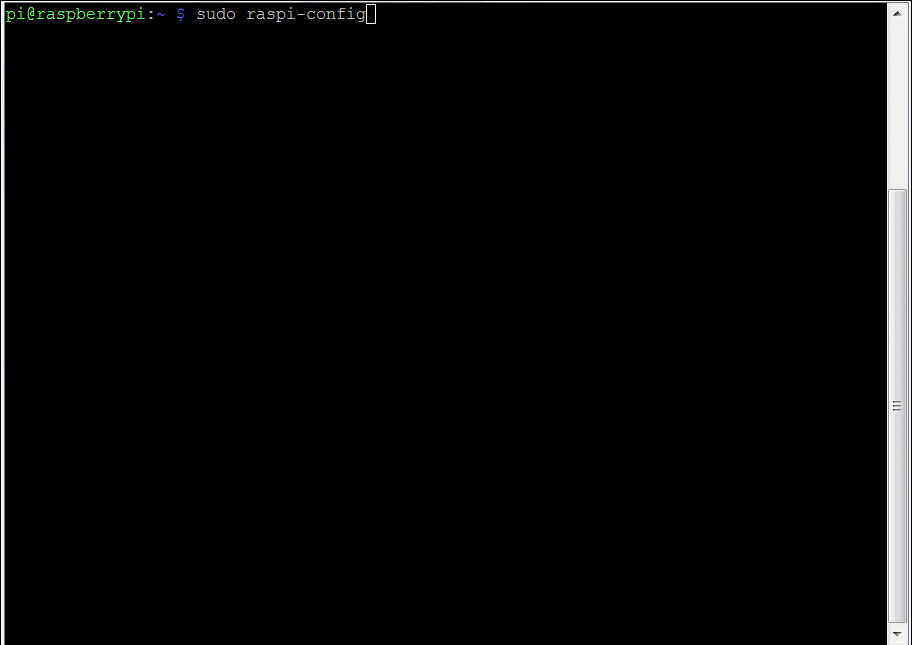
First of all, we will validate the SPI and I2C buses of the Raspberry Pi, thanks to the configuration menu.
|
1
|
sudo raspi–config
|
We now install software packages to manage these buses.
|
1
|
sudo apt–get install build–essential git–core libi2c–dev i2c–tools lm–sensors
|
In order for the modules to start we must indicated them in the modules file
|
1
|
sudo nano /etc/modules
|
You must have these two lines
|
1
2
|
i2c–dev
spidev
|
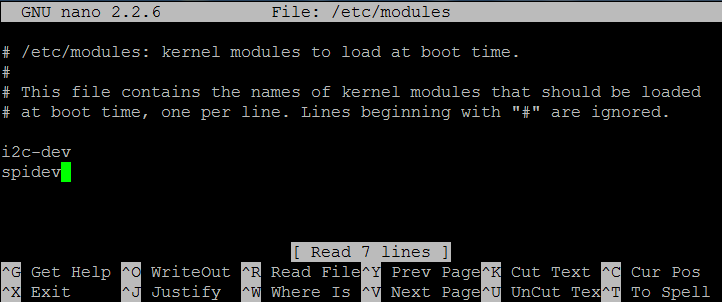
(Exit with Ctrl-X and Yes to save)
We restart the Raspberry Pi
|
1
|
sudo reboot
|
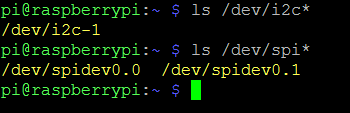
After reconnecting, we must find the ports i2c and spi
|
1
|
ls /dev/i2c*
|
|
1
|
ls /dev/spi*
|
The SSD1306 is an I2C bus version. The connection is made as shown below.
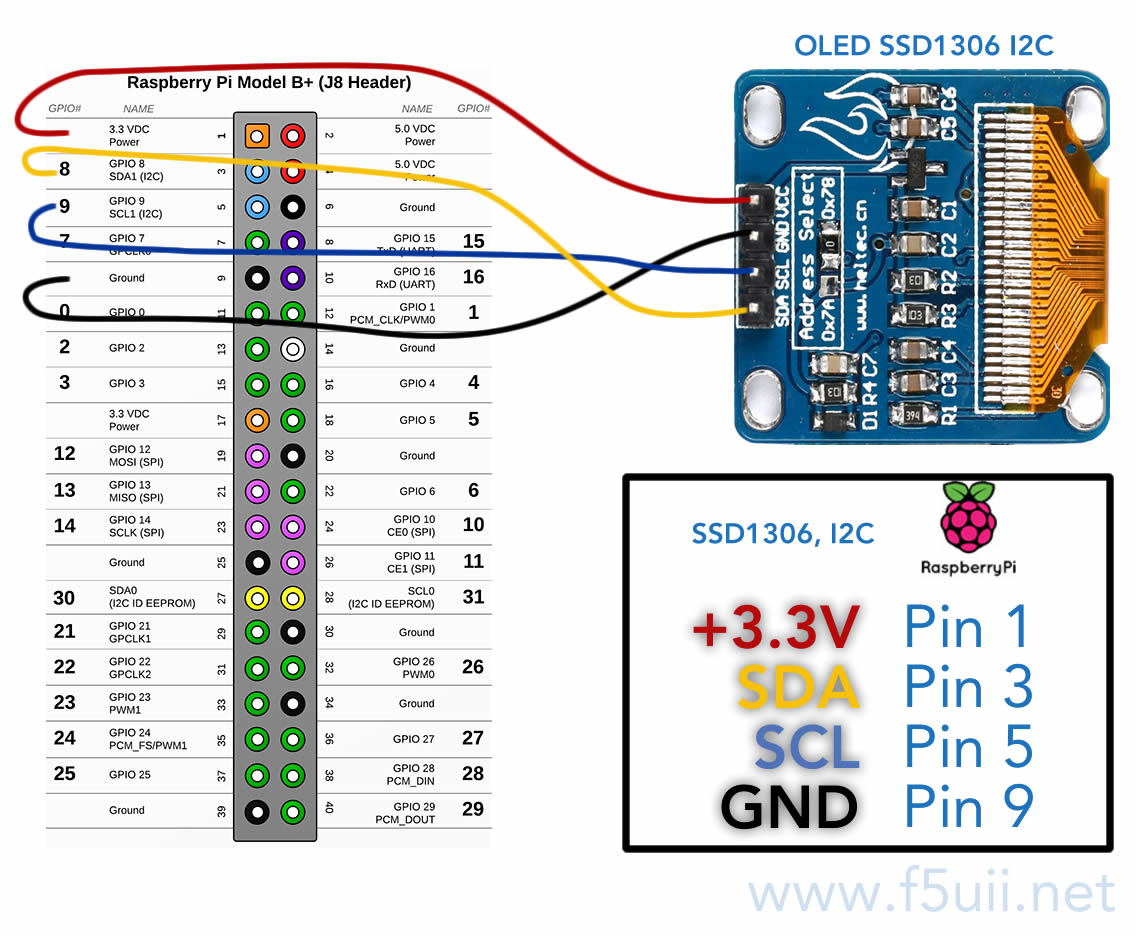
We will check that the wiring is correct and that the screen is detected on the I2C bus.
Start the following command.
|
1
|
i2cdetect –y 1
|
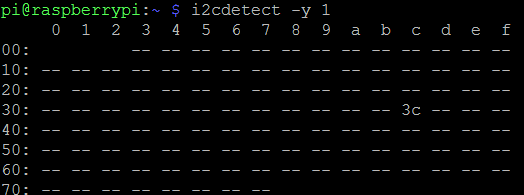
Equipment 3c appears. This is the SSD1306 screen.
If you did not install git on your Raspberry Pi, I suggest you run this command.
|
1
|
sudo apt–get install git
|
Download now the ArduiPi_OLED library (directly on github).
|
1
|
git clone https://github.com/hallard/ArduiPi_OLED
|
then run the software compilation
|
1
2
|
cd ArduiPi_OLED
sudo make
|

Let’s update MMDVMHost with these few instructions. The compilation will take several minutes.
|
1
2
3
|
cd /opt/MMDVMHost/
make clean
sudo make –f Makefile.Pi.OLED
|
|
1
2
3
4
5
6
7
8
9
10
11
12
13
14
15
16
17
18
19
20
21
22
23
24
25
26
27
28
29
30
31
32
33
34
35
36
37
38
39
40
41
42
43
44
45
46
47
48
49
50
51
52
53
54
55
56
57
58
59
60
61
62
63
64
65
66
67
68
69
70
|
pi@raspberrypi:/opt/MMDVMHost $ <strong>sudo make clean</strong>
rm –f MMDVMHost *.o *.d *.bak *~ GitVersion.h
pi@raspberrypi:/opt/MMDVMHost $ <strong>sudo make –f Makefile.Pi.OLED</strong>
echo “const char *gitversion = \”24358357e890a928f0053bcedd748123d7a6b9c2\”;” > GitVersion.h
g++ –g –O3 –Wall –std=c++0x –pthread –DOLED –I/usr/local/include –c –o AMBEFEC.o AMBEFEC.cpp
g++ –g –O3 –Wall –std=c++0x –pthread –DOLED –I/usr/local/include –c –o BCH.o BCH.cpp
g++ –g –O3 –Wall –std=c++0x –pthread –DOLED –I/usr/local/include –c –o BPTC19696.o BPTC19696.cpp
g++ –g –O3 –Wall –std=c++0x –pthread –DOLED –I/usr/local/include –c –o Conf.o Conf.cpp
g++ –g –O3 –Wall –std=c++0x –pthread –DOLED –I/usr/local/include –c –o CRC.o CRC.cpp
g++ –g –O3 –Wall –std=c++0x –pthread –DOLED –I/usr/local/include –c –o Display.o Display.cpp
g++ –g –O3 –Wall –std=c++0x –pthread –DOLED –I/usr/local/include –c –o DMRControl.o DMRControl.cpp
g++ –g –O3 –Wall –std=c++0x –pthread –DOLED –I/usr/local/include –c –o DMRCSBK.o DMRCSBK.cpp
g++ –g –O3 –Wall –std=c++0x –pthread –DOLED –I/usr/local/include –c –o DMRData.o DMRData.cpp
g++ –g –O3 –Wall –std=c++0x –pthread –DOLED –I/usr/local/include –c –o DMRDataHeader.o DMRDataHeader.cpp
g++ –g –O3 –Wall –std=c++0x –pthread –DOLED –I/usr/local/include –c –o DMREMB.o DMREMB.cpp
g++ –g –O3 –Wall –std=c++0x –pthread –DOLED –I/usr/local/include –c –o DMREmbeddedData.o DMREmbeddedData.cpp
g++ –g –O3 –Wall –std=c++0x –pthread –DOLED –I/usr/local/include –c –o DMRFullLC.o DMRFullLC.cpp
g++ –g –O3 –Wall –std=c++0x –pthread –DOLED –I/usr/local/include –c –o DMRLookup.o DMRLookup.cpp
g++ –g –O3 –Wall –std=c++0x –pthread –DOLED –I/usr/local/include –c –o DMRLC.o DMRLC.cpp
g++ –g –O3 –Wall –std=c++0x –pthread –DOLED –I/usr/local/include –c –o DMRNetwork.o DMRNetwork.cpp
g++ –g –O3 –Wall –std=c++0x –pthread –DOLED –I/usr/local/include –c –o DMRShortLC.o DMRShortLC.cpp
g++ –g –O3 –Wall –std=c++0x –pthread –DOLED –I/usr/local/include –c –o DMRSlot.o DMRSlot.cpp
g++ –g –O3 –Wall –std=c++0x –pthread –DOLED –I/usr/local/include –c –o DMRSlotType.o DMRSlotType.cpp
g++ –g –O3 –Wall –std=c++0x –pthread –DOLED –I/usr/local/include –c –o DMRAccessControl.o DMRAccessControl.cpp
g++ –g –O3 –Wall –std=c++0x –pthread –DOLED –I/usr/local/include –c –o DMRTrellis.o DMRTrellis.cpp
g++ –g –O3 –Wall –std=c++0x –pthread –DOLED –I/usr/local/include –c –o DStarControl.o DStarControl.cpp
g++ –g –O3 –Wall –std=c++0x –pthread –DOLED –I/usr/local/include –c –o DStarHeader.o DStarHeader.cpp
g++ –g –O3 –Wall –std=c++0x –pthread –DOLED –I/usr/local/include –c –o DStarNetwork.o DStarNetwork.cpp
g++ –g –O3 –Wall –std=c++0x –pthread –DOLED –I/usr/local/include –c –o DStarSlowData.o DStarSlowData.cpp
g++ –g –O3 –Wall –std=c++0x –pthread –DOLED –I/usr/local/include –c –o Golay2087.o Golay2087.cpp
g++ –g –O3 –Wall –std=c++0x –pthread –DOLED –I/usr/local/include –c –o Golay24128.o Golay24128.cpp
g++ –g –O3 –Wall –std=c++0x –pthread –DOLED –I/usr/local/include –c –o Hamming.o Hamming.cpp
g++ –g –O3 –Wall –std=c++0x –pthread –DOLED –I/usr/local/include –c –o OLED.o OLED.cpp
g++ –g –O3 –Wall –std=c++0x –pthread –DOLED –I/usr/local/include –c –o LCDproc.o LCDproc.cpp
g++ –g –O3 –Wall –std=c++0x –pthread –DOLED –I/usr/local/include –c –o Log.o Log.cpp
g++ –g –O3 –Wall –std=c++0x –pthread –DOLED –I/usr/local/include –c –o MMDVMHost.o MMDVMHost.cpp
g++ –g –O3 –Wall –std=c++0x –pthread –DOLED –I/usr/local/include –c –o Modem.o Modem.cpp
g++ –g –O3 –Wall –std=c++0x –pthread –DOLED –I/usr/local/include –c –o ModemSerialPort.o ModemSerialPort.cpp
g++ –g –O3 –Wall –std=c++0x –pthread –DOLED –I/usr/local/include –c –o Mutex.o Mutex.cpp
g++ –g –O3 –Wall –std=c++0x –pthread –DOLED –I/usr/local/include –c –o Nextion.o Nextion.cpp
g++ –g –O3 –Wall –std=c++0x –pthread –DOLED –I/usr/local/include –c –o NullDisplay.o NullDisplay.cpp
g++ –g –O3 –Wall –std=c++0x –pthread –DOLED –I/usr/local/include –c –o P25Audio.o P25Audio.cpp
g++ –g –O3 –Wall –std=c++0x –pthread –DOLED –I/usr/local/include –c –o P25Control.o P25Control.cpp
g++ –g –O3 –Wall –std=c++0x –pthread –DOLED –I/usr/local/include –c –o P25Data.o P25Data.cpp
g++ –g –O3 –Wall –std=c++0x –pthread –DOLED –I/usr/local/include –c –o P25LowSpeedData.o P25LowSpeedData.cpp
g++ –g –O3 –Wall –std=c++0x –pthread –DOLED –I/usr/local/include –c –o P25Network.o P25Network.cpp
g++ –g –O3 –Wall –std=c++0x –pthread –DOLED –I/usr/local/include –c –o P25NID.o P25NID.cpp
g++ –g –O3 –Wall –std=c++0x –pthread –DOLED –I/usr/local/include –c –o P25Utils.o P25Utils.cpp
g++ –g –O3 –Wall –std=c++0x –pthread –DOLED –I/usr/local/include –c –o QR1676.o QR1676.cpp
g++ –g –O3 –Wall –std=c++0x –pthread –DOLED –I/usr/local/include –c –o RS129.o RS129.cpp
g++ –g –O3 –Wall –std=c++0x –pthread –DOLED –I/usr/local/include –c –o RS241213.o RS241213.cpp
g++ –g –O3 –Wall –std=c++0x –pthread –DOLED –I/usr/local/include –c –o RSSIInterpolator.o RSSIInterpolator.cpp
g++ –g –O3 –Wall –std=c++0x –pthread –DOLED –I/usr/local/include –c –o SerialController.o SerialController.cpp
g++ –g –O3 –Wall –std=c++0x –pthread –DOLED –I/usr/local/include –c –o SerialPort.o SerialPort.cpp
g++ –g –O3 –Wall –std=c++0x –pthread –DOLED –I/usr/local/include –c –o SHA256.o SHA256.cpp
g++ –g –O3 –Wall –std=c++0x –pthread –DOLED –I/usr/local/include –c –o StopWatch.o StopWatch.cpp
g++ –g –O3 –Wall –std=c++0x –pthread –DOLED –I/usr/local/include –c –o Sync.o Sync.cpp
g++ –g –O3 –Wall –std=c++0x –pthread –DOLED –I/usr/local/include –c –o TFTSerial.o TFTSerial.cpp
g++ –g –O3 –Wall –std=c++0x –pthread –DOLED –I/usr/local/include –c –o Thread.o Thread.cpp
g++ –g –O3 –Wall –std=c++0x –pthread –DOLED –I/usr/local/include –c –o Timer.o Timer.cpp
g++ –g –O3 –Wall –std=c++0x –pthread –DOLED –I/usr/local/include –c –o UDPSocket.o UDPSocket.cpp
g++ –g –O3 –Wall –std=c++0x –pthread –DOLED –I/usr/local/include –c –o UMP.o UMP.cpp
g++ –g –O3 –Wall –std=c++0x –pthread –DOLED –I/usr/local/include –c –o Utils.o Utils.cpp
g++ –g –O3 –Wall –std=c++0x –pthread –DOLED –I/usr/local/include –c –o YSFControl.o YSFControl.cpp
g++ –g –O3 –Wall –std=c++0x –pthread –DOLED –I/usr/local/include –c –o YSFConvolution.o YSFConvolution.cpp
g++ –g –O3 –Wall –std=c++0x –pthread –DOLED –I/usr/local/include –c –o YSFFICH.o YSFFICH.cpp
g++ –g –O3 –Wall –std=c++0x –pthread –DOLED –I/usr/local/include –c –o YSFNetwork.o YSFNetwork.cpp
g++ –g –O3 –Wall –std=c++0x –pthread –DOLED –I/usr/local/include –c –o YSFPayload.o YSFPayload.cpp
g++ AMBEFEC.o BCH.o BPTC19696.o Conf.o CRC.o Display.o DMRControl.o DMRCSBK.o DMRData.o DMRDataHeader.o DMREMB.o DMREmbeddedData.o DMRFullLC.o DMRLookup.o DMRLC.o DMRNetwork.o DMRShortLC.o DMRSlot.o DMRSlotType.o DMRAccessControl.o DMRTrellis.o DStarControl.o DStarHeader.o DStarNetwork.o DStarSlowData.o Golay2087.o Golay24128.o Hamming.o OLED.o LCDproc.o Log.o MMDVMHost.o Modem.o ModemSerialPort.o Mutex.o Nextion.o NullDisplay.o P25Audio.o P25Control.o P25Data.o P25LowSpeedData.o P25Network.o P25NID.o P25Utils.o QR1676.o RS129.o RS241213.o RSSIInterpolator.o SerialController.o SerialPort.o SHA256.o StopWatch.o Sync.o TFTSerial.o Thread.o Timer.o UDPSocket.o UMP.o Utils.o YSFControl.o YSFConvolution.o YSFFICH.o YSFNetwork.o YSFPayload.o –g –O3 –Wall –std=c++0x –pthread –DOLED –I/usr/local/include –lArduiPi_OLED –lpthread –o MMDVMHost
pi@raspberrypi:/opt/MMDVMHost $ sudo reboot
|
Here is the final step. Now, in the [General] section of the MMDVM.ini file, we have installed an OLED screen
|
1
|
sudo nano /opt/MMDVMHost/MMDVM.ini
|
|
1
2
3
4
5
6
7
8
9
10
11
|
[General]
Callsign=F5ZKS
Timeout=600
Duplex=1
# ModeHang=10
RFModeHang=10
NetModeHang=3
#Display=Nextion
Display=<strong>OLED</strong>
#Display=None
Daemon=0
|
It refers to the OLED section that we do not have to change
|
1
2
3
4
|
[OLED]
Type=3
Brightness=0
Invert=0
|
Finally, we need to restart the Raspberry Pi
|
1
|
sudo reboot
|
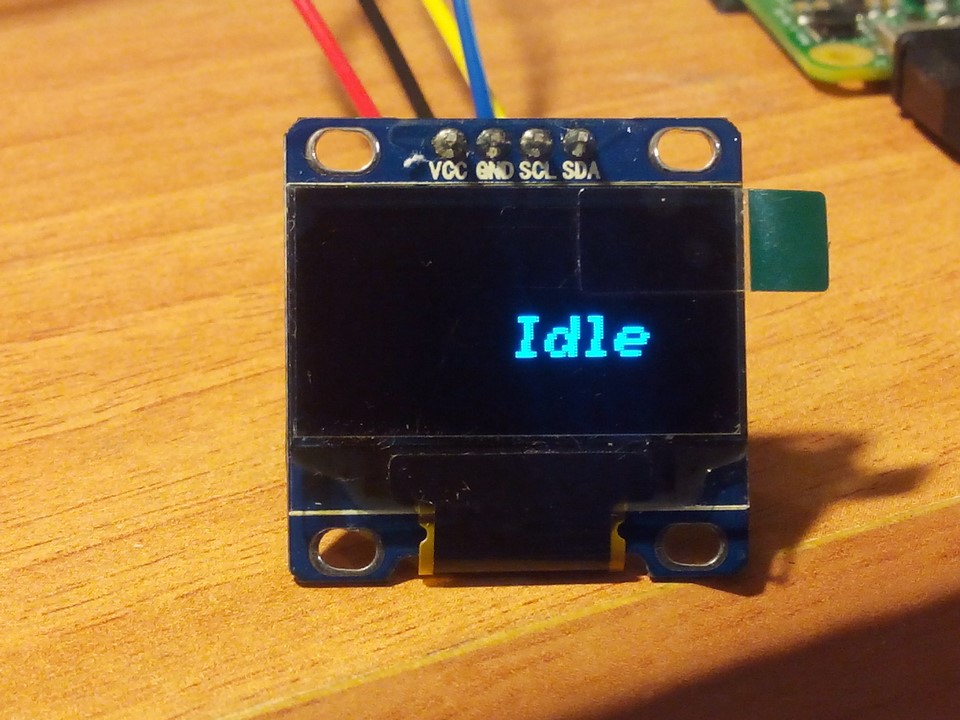
The display SSD1306 lights up. It is waiting for traffic
SSD1306 I2C display connected to Raspberry Pi, and driven by MMDVMHost
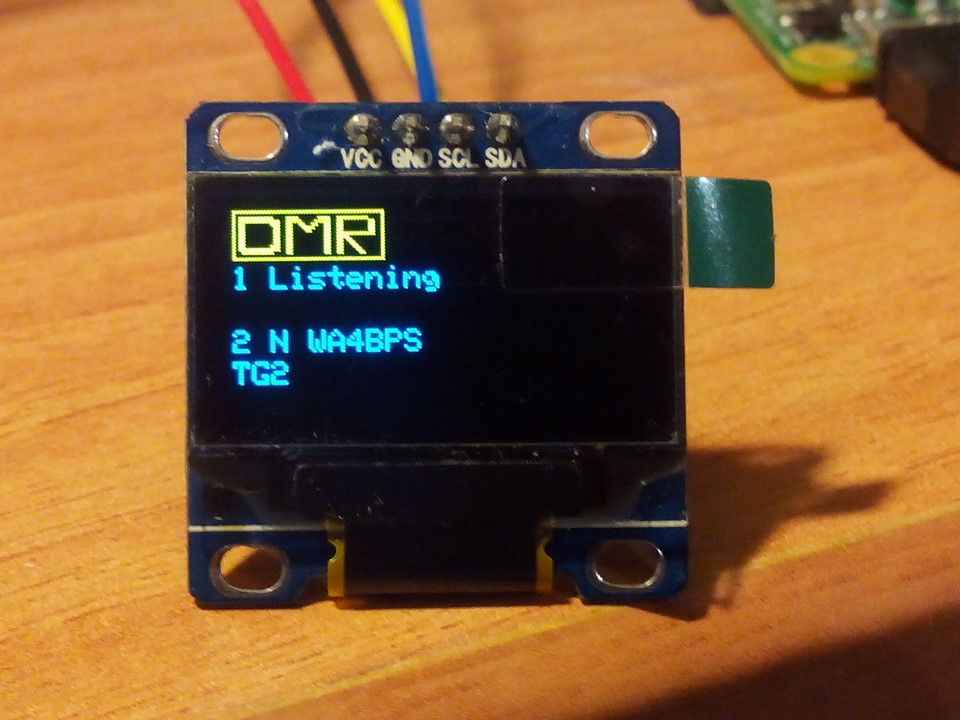
On the talk group TG2, WA4BPS is displayed, it is retransmitted on the Time Slot 2 in DMR
Bron: Hobbyscoop.nl
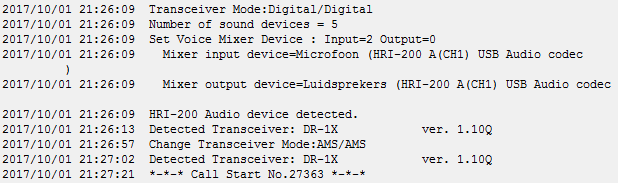
 Het moet ons van ’t hart: De implementatie van de Yaesu System Fusion technologie gaat niet zonder slag of stoot. Al sinds de eerste testen in 2016 liepen we tegen een flinke hoeveelheid problemen aan die zowel hard- als software gerelateerd waren. Aan de hardwarezijde bleken eindversterkers snel defect te raken door een gebrekkige PCB koeling van onze DR-1X repeaters. Dit hebben we in eigen beheer opgelost met een officiele modificatie van Yaesu.
De softwareproblemen waren omvangrijker: In eerste instantie was er erg veel loos, zowel in de repeaterfirmware zelf als ook in de Wires-X toepassingen voor de room koppeling die we in gedachten hadden. Doordat het verkrijgen van een vergunning voor PI1NOS en PI1AMS (en nog twee andere repeaters die ooit in de pen zitten als we weer zakgeld hebben gekregen) door Agentschap Telecom werd tegengehouden hebben we in 2016 het Fusion project voorlopig in de ijskast gezet. Medio 2017 kwam hier gelukkig verandering in en konden we beide repeaters online brengen. Aan de repeaterkant was een zeer omvangrijke firmware upgrade nodig naar versie 1.10Q. Daarmee waren de grootste problemen opgelost, al komt het helaas nog steeds af en toe voor dat de repeater zich spontaan ‘ophangt’. We zouden Hobbyscoop niet zijn als we hiervoor een technische oplossing hebben bedacht in vorm van een PDU (Power Distribution Unit) waarmee we domweg de repeater een power-cycle kunnen geven.
Ook de HRI-200 kreeg een firmware upgrade evenals de Wires-X software. Vanaf software versie 1.12 leek het geheel vrij behoorlijk te werken, met uitzondering van een enkele crash. Dit werkte enige tijd goed, gebruikers hadden weinig klachten. In augustus 2017 kondigde Yaesu aan te werken aan een verbeterde Fusion, namelijk System Fusion 2. Het belangrijkste bericht hierbij is dat deze variant een functionele uitbreiding zou betekenen op het al bestaande System Fusion en daarmee ook helemaal compatible zou zijn.
 Niets bleek minder waar helaas: om ons onbekende redenen begon PI1NOS verschijnselen te vertonen die we niet goed konden verklaren en steeds vaker bleken voor te komen. De repeater werd namelijk zonder aanwijsbare reden uit de “Hobbyscoop Room” gedisconnect en was daarmee grote dagdelen zwevend, zonder verbinding naar de andere deelsystemen en gebruikers. Dit kon weliswaar door gebruikers weer aangekoppeld worden maar het is wel een groot obstakel gebleken in het logische gebruik van de repeater. Nog vreemder: PI1AMS met identieke setup en instellingen vertoonde dit probleem niet. Dat was zoeken naar een speld in een hooiberg.
 De oplossing werd bekend: De introductie van de portofoon Yaesu FT-70D zorgde ervoor dat een eerste portofoon beschikbaar was die al functies van Yaesu System Fusion 2 ondersteunt. Onze lopende Wires-X software 1.12 ondersteunde dit echter niet. Gebleken is dat telkens bij het in de lucht komen van een FT-70D (en daar zijn er al de nodige van gesignaleerd op PI1NOS) de repeater uit de room werd ‘gemeden’ vanwege de incompatibiliteit. Yaesu geeft zelf aan dat de nieuwe Wires-X software V1.22 de gerezen problemen ondervangt doordat hier al de nodige Fusion 2 functies zijn geimplementeerd (al is ons niet exact duidelijk welke, mogelijk beperkt dit zich tot de protocolstack en niet tot extra functies). Het belabberde was echter dat V1.22 weer een nieuw probleem naar boven bracht: De Wires-X bediening van PI1NOS via de gebruikerstransceivers werkte niet meer!
Zo kwamen we van de regen in de drup en is in eerste instantie teruggeschakeld naar de oudere firmware V1.12. Zaligmakend was dit natuurlijk allesbehalve en omdat het voor de gebruikers een onwerkbare situatie bleek hebben we ervoor gekozen om toch naar 1.22 te schakelen en te wachten tot we een update van Yaesu zouden ontvangen die beide problemen oplossen. Zo ver kwam het gelukkig niet. Door een toeval tijdens het doen van allerlei testen kwamen we tot het inzicht dat met een technische truuk de functionaliteit toch geheel werkend te krijgen is. Hiervoor moesten we uit de (Hobbyscoop) room schakelen om vervolgens de repeaterbesturing te schakelen van analoog naar digitaal, vervolgens nog een keer naar analoog en uiteindelijk in de digitale mode vast te zetten. Vanaf dit moment blijft PI1NOS in de hobbyscoop room actief en is het tevens mogelijk om de repeater te bedienen zoals dit eigenlijk gewenst is.
De komende dagen wachten we eventjes af, maar we hopen dat we met deze toevallige ontdekking een heleboel gebruikers blij hebben gemaakt, andere repeaterbeheerders kunnen hopelijk ook hiervan profiteren…
Wordt vast wel weer vervolgd, want helaas hebben we niet zo’n hoge pet op van de performance van de Yaesu System Fusion software…
Reactie van de redactie: (Inmiddels is gebleken dat bijvoorbeeld de FT2DR een upgrade moet krijgen naar versie 0913 om de X knop te laten werken. Yaesu clean up your act!!!)

Deze week zijn de C4FM repeaters PI1NOS, PI1AMS, PI3VHP en PI1TWE geüpgraded naar versie 1.220 voor Wires-X. Bij gebruik van de repeaters door de nieuwe FT-70DR portofoon werkte het netwerk niet meer naar behoren. Dit betekent dat ook de overige System Fusion apparatuur een upgrade moet krijgen. Bij de FT2DR betekende het bijvoorbeeld dat de X functie niet meer werkte en je niet kon verbinden met een room. Door de upgrade naar versie 0913 is dit verholpen en werkt alles weer naar behoren. Hiermee is ook in Nederland een stap gezet richting System Fusion II.
Alle upgrade firmware vind je hier!