Bron: HVDN Notebook
The dual band TYT MD-UV380 has just been released and promises much of the same functionality of the TYT MD-2017 and Retevis RT-82, but in the same form factor as the ever popular mono-band MD-380 and MD-390 series of radios.
This review goes under the hood of this latest $149.99 priced DMR & analog FM dual band handheld radio.
 |
| RF deck top view of the MD-UV380 |
Basic Overview
The MD-380 has been well reviewed elsewhere plus in past articles here on HVDN like the 2017 DMR entry level radio review.
The new MD-UV380 and MD-UV390 look identical to the mono-band versions and also include options with or without GPS.
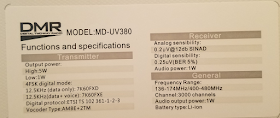
Here are some side shots of the MD-UV380 (GPS) box which is somewhat informative on specifications.
Out Of The Box Differences
The firmware version out of the box for this sample was S15.021. The latest version as of the date of this article appears to be S16.06 based on the TYT website download from May 23rd 2018.
While scrolling through the features in the CPS 1.03 and then updated into the radio to unlock certain menus, the major feature add on with the MD-UV380 is the ability to have up to 3 radio ID’s and to change the mic gain.
Everything else is pretty much the same as the MD-380 stock firmware flow, not including the obvious addition of VHF and UHF coverage, like the MD-2017.
One feature introduced in the MD-2017 was built in “promiscuous” mode that allows monitoring of all DMR traffic on a specific time slot and correct color code. This has also made its way into the MD-UV380.
Also, like the MD-2017, the MD-UV380 can either allow audio to be recorded in DMR mode or provide the user with more contact storage space for the entire DMR ID database. Different firmware exists for either option for the MD-UV380 or MD-UV390.
From an outside hardware perspective, the MD-UV380 uses all the same accessories as the MD-380. Same goes for the MD-390, which is just slightly larger than the MD-380. This is nice in order to recycle things like chargers, batteries and programming cords between the old and new radios. The GD-77 by Radioddity also uses the same charger as the MD-380, so for users looking for a new dual band radio may want to consider the MD-UV380 over other similar radios.
The included stock dual band antenna seems to be of slightly higher quality compared to the antennas included with the mono-band MD-380/390 radios. The base of the MD-UV380 has an extended ferule to provide a little more waterproofing on the antenna connector on the radio.
Navigating the MD-UV380
Compared to the MD-2017 with its roller ball navigation, the MD-UV380 uses the arrow buttons below the display to flip between the upper and lower band assignments. This makes the UV-MD380 more like the Radioddity GD-77 or Anytone D868A from a navigation factor which is slightly less cumbersome than the MD-2017 roller-ball and will likely hold up better over time and prevent accidental band swaps or channel changes.
Channel selection in either the upper or lower band on the MD-UV380 is done through the top mount multi-selector knob. Compared to the MD380, there is no more limitation to 16 channels per zone which was sort of hard coded against the 16 position channel selector knob. On the MD-UV380, as many as 64 channels per zone and possibly more is possible.
There will be more to talk about when it comes to the firmware updates, upgrades, channel management and overall user features, but that is not the main goal of this tear-down and comparison.
On the outside of the MD-UV380 from a distance, it would be hard to tell the difference between the MD-380, MD-380G, MD-390 and MD-390G. They all look the same and the only differences is the multi-selector knob, the label under the battery showing the model name and button coloration differences.
Inside the MD-UV380 and compared to the MD-380G
This is where things get interesting because the outside looks the same, but the inside does not. Here are side by side comparisons of the MD-380G and the MD-UV380 (GPS). The outer-casing on the MD-UV380 seems to be styled like the earlier TYT versions whereas later ones had a more rounded speaker grill and colored buttons.
 |
| MD-UV380 on the left and MD-380G on the right |
Things get interesting when looking at the two parts of the radio side by side after opening both up.
The MD-380G and MD-UV380 share the same exact board numbering for the user interface side of the radio as noted by KEY-V2.0-160329 text. In the upper left corner near the speaker you can see the GPS antenna.
 |
| MD-UV380 on the left. MD-380G on the right. Note the colored orange and blue buttons on the right side of the MD-380G |
Swapping the RF deck from either radio with the UI board from the other confirms there is only one tiny difference. The flat cable connector on both is slightly different which may just be a sourcing reason. The connector on the MD-380 was a “piano hinge” type and the MD-UV380 was “compression lock” type. The flat ribbon cable fits the same way. Its possible over time that the “compression lock” version may be more reliable and limit the potential “white screen” issues some users have experienced when the connector and cable are not mated tightly at the factory.
Both radios upon re-assembly with the UI board and RF deck from both models confirmed identical operation and functionality.
Should someone want the slightly more rounded housing and colored buttons from a MD-380G, but with the functions of the MD-UV380, this may be good to know.
The UI is the same but not the RF deck
As you would expect, the design of a dual-band radio would be just a little different than a mono-band version. Here is a side by side of both radios from the inside.
 |
| MD-UV380 at left and MD-380G at right |
The major differences here get sort of fun. The same STM32F405 is used across both radios, but gone is the HR C5000 base band chip on the front side as in the MD-380.
In the MD-380G, the ST Microelectronics STM32F405VG is used which sports an ARM Cortex M4 core, up to 168MHz clock speed and 1024 KB of on board RAM. A more detailed spec sheet can be found on the STM website here.
The new MD-UV380 has the same STM32F405VG, but with slightly different date codes. It is unknown without further dissection if there are any small changes in the MCU since there is likely 2-3 time difference between the manufacture of both radios.
 |
| The “527” version was found in the MD-380 and the “664” version was found in the MD-UV380 |
Both radios also have the same Winbond 128K memory (W25Q128FV), but you may notice an empty pad for possibly an additional memory expansion on the MD-UV380. This may be helpful as the user database for DMR ID’s soon surpasses 100,000 which is the current limitation of many radios. As more DMR uses experiment with GPS, SMS and other mode translations such as those just introduced in Pi-Star, having additional memory will be a useful thing to have.
 |
| Note the empty pads for additional memory such as the 128k Winbond chip to left of STM32F4055VG |
For those that remember, the VHF versions of the MD-380 had less memory compared to the UHF versions which limited further alternative firmware development made popular by Travis Goodspeed, Ty Weaver, Warren Merkel and many others.
Perhaps lessons have been learned with the MD-UV380 to allow for future memory upgrades without complete redesign. Its clear that TYT used the same UI board to simplify construction and offer a lower priced radio.
It seems all they really needed to do was just redesign the RF deck on the MD-UV380 after learning from the success and failures of the MD-2017 user interface and overly sized casing.
RF Front End
The RF front end is a combination of filtering for radio transmit and receive functions. On the MD-UV380 we can see some of that by looking at the SMD capacitors, resistors and inductors between the antenna connector and the copper pad which is a heat spreader for the RFPA on the underside of the RF deck board.
The MD-UV380 is a 136-174 MHz and 400-480 MHz radio, so its filtering would be more complex as expected compared to the UHF only version of the MD-380G.
Is That It?
Clearly the top side of the MD-UV380 seems more simple from a base-band perspective compared to that of the MD-380, but that is likely not the case. All we have learned so far without further disassembly is the following:
- Both radios appear to use the same STM MCU
- Both radios have the same Winbond flash memory
- The MD-UV380 seems to have the ability to increase on board memory due to empty pads.
- The MD-UV380 may be using something else for base-band RF compared to the MD-380
- The UI boards are common across both radios
- The older style and slightly larger housing from earlier MD-380 radios is used for the MD-UV380


