Bron: dp.nonoo.hu
I’ve translated my recent blogpost on ham-dmr.hu, so here’s some info about the Hytera RD625 DMR repeater and about setting up VoIP communications.
We’ve measured the bandwidth required for the repeater to communicate with the DMR master software to transfer one timeslot. The result is 15-17 kbit/s for both up and download directions, so the bandwidth required is about 35 kbit/sec, if there’s someone talking on one timeslot. We’ve conducted the tests using a 3G internet connection with an 8 slot length jitter buffer. The latency of our 3G connection is quite high, but the voice communication remained perfect. I’ve made a video about the tests:
Some interesting facts
The blue LED under the D sign is on when the repeater is communicating with the master software. When the repeater connects to the master, a voice says on TS2 TG9 that the reflector 4770 got connected.
The repeater doesn’t care about an unplugged Ethernet cable, it won’t ask for a new IP address. It doesn’t care about DHCP lease timeouts, it only asks for an IP address in DHCP mode only when we power it on.
All 3G connections are NATted in Hungary, so there’s no external address and connection tracking for the UDP packets, so incoming packets can’t find a way to the repeater. We had the repeater plugged into a Routerboard, which had the 3G stick in it, and we created a VPN tunnel to our server and set the default gateway for that VPN connection. This way we had an external IP address and could set up our firewall to pass through UDP packets destined to the repeater.
The repeater uses the following UDP ports: 62005 (status, heartbeat, etc.), 62006 (general traffic), 62007 (management info, RDAC)
Setting up a SIP server (Asterisk)
It’s important to mention that an amateur radio network can’t be connected to other telecommunication systems for replacing them, so it’s forbidden to connect the DMR system to the GSM phone network. This post is only about experimentation.
I don’t explain all the details about setting up an Asterisk server, there’s a lot of info about it on the net.
First we have to create entries in sip.conf for the DMR users we want to allow starting outgoing calls:
[112161005]
type=friend
secret=pass123
host=dynamic
callerid=”HA2NON”
context=nonoo
transport=udp
directmedia=no
[112161006]
type=friend
secret=pass321
host=dynamic
callerid=”HG1MA”
context=nonoo
transport=udp
directmedia=no
The structure of the user ID: call type (1 – private, 2 – group) + timeslot + DMR ID, example: 1 – private call, 1 – timeslot, 2161005 – DMR ID, so it’s 112161005. More about on the structure later.
To be able to receive calls, we have to create extensions for the users in extensions.conf:
exten => 1,1,Dial(SIP/112161005,,tT)
exten => 2,1,Dial(SIP/112161006,,tT)
This way if we call the number 1 on the SIP server, we will dial DMR user 2161005 with a private call on timeslot 1.
Setting up the repeater for VoIP

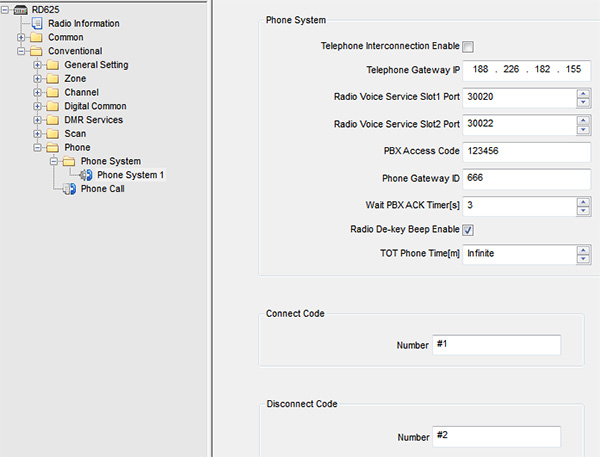
First, enable Telephone Interconnection Enable in Phone->Phone System, then enter the Asterisk server’s IP address to Gateway IP. PBX Access Code is the SIP password, Phone Gateway ID is the number, which has to be called on the handheld device in a group or private call. Connect Code should be #1, Disconnect Code should be #2. Radio De-key Beep should be enabled, so the called party will hear a beep when we release the PTT so he/she will know when we finished talking and can hear what he/she says.
Setting up a PD785G for VoIP

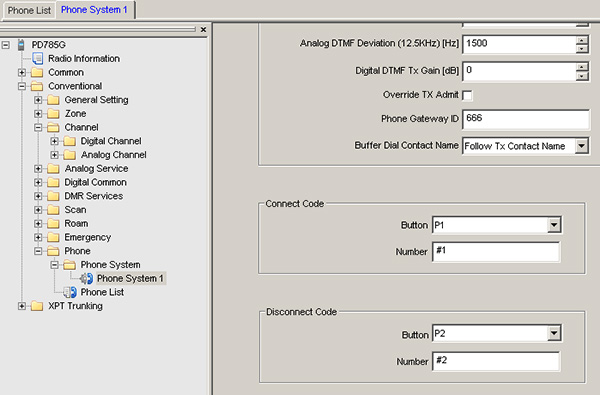
First, we have to add a Phone Systeme in the Hytera CPS at Phone System menu. Set the Phone Gateway ID to the Gateway ID (we tested using the gateway ID 666 as can be seen on the video above), Connect Code button should be set to P1-re, number should be #1, Disconnect Code button should be set to P2, number should be #2.
The Phone System should be set to the previously added one on the digital channels where we want to use it.
Starting and stopping a call
To start a VoIP call from the handheld radio, we have to enter the previously set Gateway ID in a private or a group call, press the PTT continuously, and then we have to enter the number to call (make sure DTMF keypad is previously got enabled in the CPS!). Release the PTT button after entering the number. To pick up an incoming call, press the PTT, press the green button, and then release the PTT. This can be done because we have set the Connect Code button to P1 previously, so pressing P1 will enter the Connect Code (it was set to #1) instantly. To hang up a call, press the PTT, then press the red button, and then release the PTT (this will enter the Disconnect Code).
SIP registration, user management
If we enable the Dial-up Mapping in the repeater CPS, then the repeater will try to register to all of the Phone IDs to the SIP server which are in the list. If the SIP server receives a call for a Phone ID, then the repeater will call the Radio ID associated with that Phone ID.
If Dial-up Mapping is off, then the repeater will try to register the previously mentioned calltype+timeslot+DMR ID format Radio IDs (not Phone IDs!) on the SIP server. If we add time slot 1, Radio ID 9 as a group call, then it will register on the SIP server with the ID 219. If we call 219 on the SIP server, then the call will be automatically routed to timeslot 1 talk group 9. This call can be interrupted by any DMR user with the usual PTT press + red button + PTT release combination.
If we start a call from a Radio ID which is not in the mapping list, then the repeater will try to register it on the SIP server when starting the call. This means that only those DMR users can start a call who has a SIP user in Asterisk.

